
티스토리 뷰
스프링은 애플리케이션 전 계층에서 도메인 객체를 검증할 수 있는 인터페이스를 제공한다. 이번 글에서는 spring의 bean validation을 통해 어떻게 controller의 파라미터를 controller에 비즈니스 로직을 추가하지 않고 검증할 수 있는지 알아보자.
Validator interface
Spring은 도메인 객체를 검증할 수 있도록 Validator 인터페이스를 도입했다. Validator 인터페이스는 객체를 검증하는데 실패하면 Errors 객체에 에러를 등록함으로써 동작한다.
Validator 인터페이스는 아래의 두가지 메서드를 가지고 있다.
- supports(Class): 매개변수로 전달된 클래스를 검증할 수 있는지 여부를 반환
- validate(Object, org.springframework.validation.Errors): 매개변수로 전달된 객체를 검증하고 실패하면 Errors 객체에 에러를 등록한다.
아래 코드는 Person 객체가 있을 때 어떤식으로 Validator 인터페이스를 구현할 수 있는지 보여준다.
public class Person {
	private String name;
	private int age;

	// getters and setters
}
public class PersonValidator implements Validator {
/**
* This Validator validates *just* Person instances
*/
public boolean supports(Class clazz) {
return Person.class.equals(clazz);
}
public void validate(Object obj, Errors e) {
ValidationUtils.rejectIfEmpty(e, "name", "name.empty");
Person p = (Person) obj;
if (p.getAge() < 0) {
e.rejectValue("age", "negativevalue");
} else if (p.getAge() > 110) {
e.rejectValue("age", "too.darn.old");
}
}
}
위 코드에서 validate 함수를 보면, 검증에 실패한 경우 Errors 객체의 rejectValue 함수를 호출하는 것을 볼 수 있다. rejectValue의 파라미터는 (필드이름, 에러코드)로 구성된다. 에러코드는 뒤에서 자세히 설명하겠다.
위 코드에서 ValidationUtils라는 클래스를 이용하여 필드 검증을 하는 것을 볼 수 있는데, ValidationUtils를 이용하면 값이 비어있거나 공백문자가 있는 경우를 쉽게 확인할 수 있다.
위 코드를 테스트할 컨트롤러 메서드를 하나 작성해보겠다.
@Autowired
private PersonValidator personValidator;

/**
 * @return person 객체의 검증 성공 여부
 */
@GetMapping("person/validate/directly")
public boolean directlyValidatePerson(@ModelAttribute Person person, BindingResult result) {
	logger.debug("validate directly. {}", person);

	personValidator.validate(person, result);

	return !result.hasErrors();
}
@RunWith(SpringJUnit4ClassRunner.class)
@WebAppConfiguration
@ContextConfiguration(classes = { WebAppConfig.class, ValidatorConfig.class })
public class PersonValidateControllerTest {
@Autowired
private PersonValidator personValidator;
private MockMvc mockMvc;
@Before
public void setUp() {
this.mockMvc = MockMvcBuilders.standaloneSetup(new PersonValidateController(personValidator)).build();
}
@Test
public void directlyValidateEmptyNameTest() throws Exception {
this.mockMvc.perform(get("/person/validate/directly")
.param("name", "")
.param("age", "25"))
.andDo(print())
.andExpect(status().isOk())
.andExpect(content().string("false"));
}
@Test
public void directlyValidateWrongAgeTest() throws Exception {
// 음수 나이
this.mockMvc.perform(get("/person/validate/directly")
.param("name", "test")
.param("age", "-1"))
.andDo(print())
.andExpect(status().isOk())
.andExpect(content().string("false"));
// 100살을 초과하는 나이
this.mockMvc.perform(get("/person/validate/directly")
.param("name", "test")
.param("age", "101"))
.andDo(print())
.andExpect(status().isOk())
.andExpect(content().string("false"));
}
}
위 코드의 directlyValidatePerson 메서드를 보면 파라미터에 Person 객체 외에 BindingResult 객체를 받는 모습을 볼 수 있다. BindingResult 객체는 모델의 검증 작업에서 나타난 에러를 저장하는 역할을 하며, 이를 이용해 메서드의 실행을 분기할 수 있다.
MessageSource
위에서 Validator의 validate 함수 내에서 검증 실패시 reject 함수를 호출하는 것을 살펴봤다. 이 때 reject 함수 파라미터 중 에러코드를 지정했는데, 이는 에러메시지와 관련이 있다.
에러메시지는 보통 messages.properties 같은 properties 파일에서 읽어오도록 구현한다. Spring에서는 MessageSource를 이용해 properties 파일로부터 에러메시지를 가져오도록 할 수 있다. validate 함수의 내용을 예를들어 살펴보자.
ValidationUtils.rejectIfEmpty(errors, "name", "name.empty");위 코드에서 name.empty는 에러코드로서 messages.properties 파일에 존재하는 키값이다. messages.properties에 아래와 같이 에러코드=에러메시지 형태로 선언해줘야한다.
name.empty=The name is empty.이 값을 가져오기 위해 MessageSource를 사용해야하는데, MessageSource의 구현에는 두가지 종류가 있다.
- StaticMessageSource: 코드로 메시지를 등록한다.
- ResourceBundleMessageSource: 리소스 파일로부터 메시지를 읽어와 등록한다.
우리는 properties 파일로부터 에러메시지를 읽어올 것이므로 ResourceBundleMessageSource 클래스를 사용할 것이다. 아래 코드는 ResourceBundleMessageSource 객체를 빈으로 등록하는 코드이다.
@Bean
public MessageSource messageSource() {
	ResourceBundleMessageSource resourceBundleMessageSource = new ResourceBundleMessageSource();
	resourceBundleMessageSource.setBasename("messages");
	resourceBundleMessageSource.setDefaultEncoding("UTF-8");

	return resourceBundleMessageSource;
}
위 코드에서 setBasename은 어떤 properties 파일을 기본으로 가져와 사용할 것인지 등록하는 메서드이다. 이제 이 MessageSource 객체를 주입받아서 에러메시지를 띄우는 컨트롤러 메서드를 하나 작성해보자.
@Autowired
private MessageSource messageSource;

/**
 * @return person 객체의 검증 후 에러 메시지들
 */
@GetMapping("person/validate/get-error-messages")
public List<String> validateAndGetErrorMessages(@ModelAttribute Person person, BindingResult result) {
	logger.debug("validated. {}", person);

	personValidator.validate(person, result);

	return result.getFieldErrors().stream()
				.map(error -> messageSource.getMessage(error, Locale.getDefault()))
				.collect(Collectors.toList());
}
그리고 이에 대한 테스트 코드는 아래와 같다.
@Test
public void validateAndGetBindingResultTest() throws Exception {
this.mockMvc.perform(get("/person/validate/get-error-messages")
.param("name", "")
.param("age", "99"))
.andDo(print())
.andExpect(status().isOk());
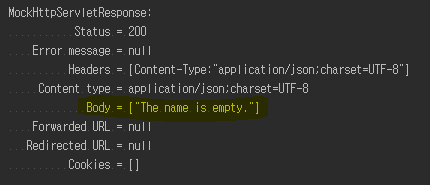
}위 코드를 보면 person에 비어있는 이름을 넣고 있다. 따라서 검증할 때 BindingResult에 name.empty 에러코드가 등록될 것이고, MessageSource가 messages.properties로부터 name.empty 에러코드에 대한 에러메시지를 가져올 것이다.
이 테스트에 대한 결과는 아래 그림 1과 같다.
MessageCodeResolver
Validator의 validate함수에서 reject 함수를 호출하면 BindingResult에 에러정보가 등록된다. 에러정보는 어떤 필드에서 에러가 났는지와 에러코드를 기본적으로 포함한다.
만약 field.required라는 에러코드를 reject 함수에 파라미터로 넣었다면, BindingResult에 단순히 field.required 에러코드만 등록되지 않고 field.required로부터 파생된 에러코드 몇가지가 자동으로 BindingResult에 등록된다.
이는 MessageCodeResolver가 하는데, Spring은 디폴트로 DefaultMessageCodeResolver를 사용한다. DefaultMessageCodeResolver가 자동으로 등록해주는 에러코드를 살펴보자.
- 에러코드.모델이름.필드이름: field.required.person.name
- 에러코드.필드이름: field.required.name
- 에러코드.타입이름: field.required.Person
- 에러코드: field.required
위처럼 field.required 에러코드를 등록하면 3가지가 더 생성된다. 위에 적어놓은 에러코드는 우선순위별로 적어놨으며, messages.properties에서 가장 우선순위가 높은 에러메시지가 사용된다.
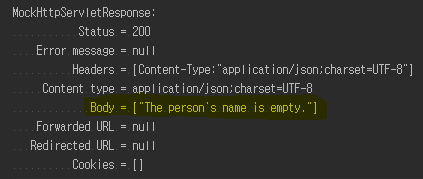
MessageSource를 설명할 때 사용했던 예제를 그대로 사용하고, messages.properties에 아래의 내용만 추가하여 다시 테스트해보자.
name.empty.person.name=The person's name is empty.테스트를 실행시켜보면 아래 그림 2와 같은 결과가 나타날 것이다.
이렇게 BindingResult 객체에 저장된 에러메시지는 jsp 시절에는 주로 jsp의 form tags 라이브러리를 이용하여 프론트에서 사용자에게 보여주기 위해 많이 사용되었다.
간단히 예를 들어 살펴보자. 아래는 person.jsp 파일과 person의 view controller 메서드이다.
<%@ page language="java" contentType="text/html; charset=UTF-8"
pageEncoding="UTF-8"%>
<%@ taglib prefix="form" uri="http://www.springframework.org/tags/form" %>
<!DOCTYPE html>
<html>
    <head>
        <meta charset="UTF-8">
        <title>Person Test</title>
    </head>
    <body>
        <h1>Person Form</h1>
        <form:form modelAttribute="person" method="get" action="/person/form">
            <form:input path="name"/>
            <form:errors path="name"/>
            <br/>
            <form:input path="age"/>
            <form:errors path="age"/>
            <br/>
            <input type="submit" value="submit">
        </form:form>
    </body>
</html>
@GetMapping("person/form")
public String personForm(@ModelAttribute Person person, BindingResult result) {
logger.debug("person form: {}", person);
personValidator.validate(person, result);
return "person";
}
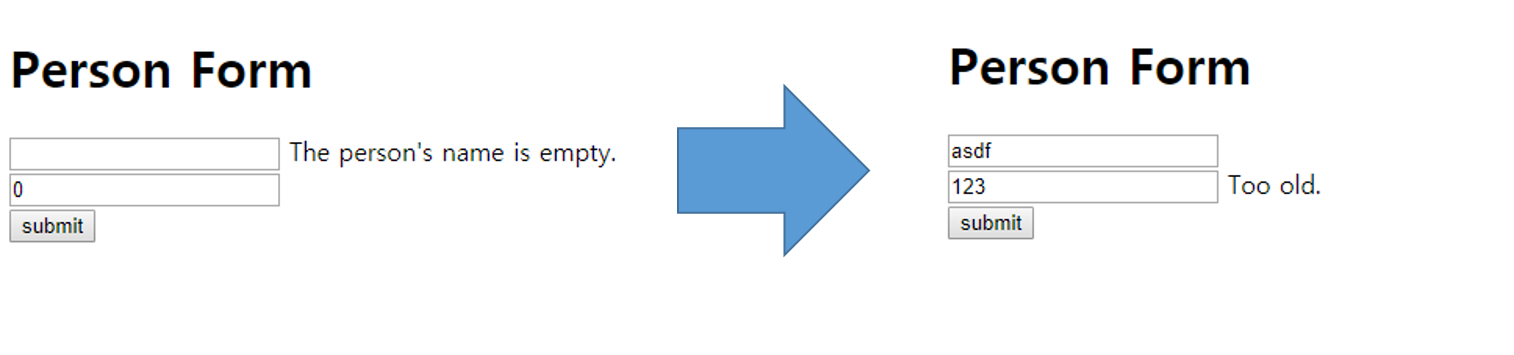
위 코드를 보면서 알 수 있는 두가지 사실이 있는데, 첫번째는 BindingResult 객체가 view에 model로 자동으로 넘겨진다는 것이다. 두번째는 form:errors 태그는 BindingResult 객체와 MessageSource 객체를 이용해 해당 필드의 에러메시지를 가져와 표시해준다는 것이다.
위 코드의 실행결과는 아래 그림 3과 같다.
Spring Validation
Spring 3부터 Bean Validation API를 제공한다. Spring Bean Validation은 위에서 설명한 Validator 인터페이스를 이용하여 직접 도메인 객체를 검증하는 방법을 표준화하고 애노테이션을 이용해 선언적으로 표현할 수 있도록 도와준다.
Bean Validation 명세는 1.0(JSR-303)부터 시작하여 현재는 2.0(JSR-380)까지 나와있다. 이 명세에 대한 구현체로 Hibernate Validator가 있으며, Spring Boot 2.0부터 Hibernate Validator 6.x(JSR-380) 버전을 기본적으로 지원하고 있다.
Hibernate Validator는 자주 쓰일만한 몇가지 검증 애노테이션을 built-in으로 제공한다. built-in 애노테이션의 리스트는 아래 참고에 링크로 두었다.
built-in annotation을 이용해 도메인 객체를 검증하는 간단한 테스트를 만들어보자.
public class Car {
	@NotBlank(message = "The manufacturer must not be empty.")
	private String manufacturer;

	@Range(min = 0, max = 100, message = "The seat count must be between 0 ~ 10")
	private int seatCount;

	@Range(min = 0, max = 300, message = "The speed must be between 0 ~ 300")
	private int topSpeed;

	// getters and setters
}
위 코드는 세가지 필드를 가지고 있는 간단한 도메인 클래스이다. 검증 조건을 애노테이션으로 선언적으로 표현한 것을 알 수 있다. 이제 이를 검증하는 Validator를 얻어와야하는데, Bean Validation API에서 LocalValidatorFactoryBean 객체를 기본으로 제공해줘서 이를 이용해 Validator 인터페이스의 bean을 생성할 수 있다. 이 객체는 org.springframework.validation.Validator 인터페이스 뿐만 아니라, javax.validation.ValidatorFactory, javax.validation.Validator 인터페이스를 모두 구현하고 있다. 이 bean을 이용해 애플리케이션 전 계층에서 객체를 검증할 수 있다. 아래는 Validator를 등록하는 과정이다.
@Bean
public Validator jsrValidator() {
	return new LocalValidatorFactoryBean();
}
이제 이 Validator를 이용해 Car 클래스의 객체를 검증하는 컨트롤러 메서드와 그의 테스트 작성해보자.
@Autowired
@Qualifier("jsrValidator")
private Validator validator;

/**
 * @return Car 객체 검증 성공 여부
 */
@GetMapping("car/validate/directly")
public boolean directlyValidateCar(@ModelAttribute Car car, BindingResult result) {
	logger.debug("validate directly. {}", car);

	validator.validate(car, result);
	logger.debug("errors: {}", result.getFieldErrors());

	return !result.hasErrors();
}
@Test
public void directlyValidateTest() throws Exception {
this.mockMvc.perform(get("/car/validate/directly")
.characterEncoding("utf-8")
.param("manufacturer", "kook")
.param("seatCount", "4")
.param("topSpeed", "200"))
.andDo(print())
.andExpect(status().isOk())
.andExpect(content().string("true"));
}
@Test
public void directlyValidatInvalidParamTest() throws Exception {
// invalid speed
this.mockMvc.perform(get("/car/validate/directly")
.characterEncoding("utf-8")
.param("manufacturer", "kook")
.param("seatCount", "4")
.param("topSpeed", "301"))
.andDo(print())
.andExpect(status().isOk())
.andExpect(content().string("false"));
// invalid seat count
this.mockMvc.perform(get("/car/validate/directly")
.characterEncoding("utf-8")
.param("manufacturer", "kook")
.param("seatCount", "-1")
.param("topSpeed", "200"))
.andDo(print())
.andExpect(status().isOk())
.andExpect(content().string("false"));
// invalid manufacturer
this.mockMvc.perform(get("/car/validate/directly")
.characterEncoding("utf-8")
.param("manufacturer", "")
.param("seatCount", "4")
.param("topSpeed", "200"))
.andDo(print())
.andExpect(status().isOk())
.andExpect(content().string("false"));
}
위 코드에서 검증 후 검증 에러의 로그를 찍도록 컨트롤러 메서드를 작성하였는데, 이 때 Car 클래스의 검증 애노테이션의 message 속성에 정의한 에러 메시지가 표시되는 것을 볼 수 있다. 아래 그림 4는 로그 중 일부를 가져온 것이다.

그림 4의 로그를 보면 애노테이션에 설정한 message 속성이 default message로 표시됨을 알 수 있다. MessageSource는 해당 에러코드에 대한 에러메시지가 존재하지 않으면 default message를 가져온다.
Spring MVC 3 Validation
Spring 3부터 Spring MVC는 컨트롤러 메서드의 파라미터를 자동으로 검증하는 애노테이션 @Valid를 제공해준다. 지금까지는 직접 도메인 객체를 검증하였지만, 이제는 컨트롤러 메서드에서 검증하는 로직을 완전히 제거할 수 있게되었다.
아래 코드는 @Valid 애노테이션을 이용한 자동 검증 메서드이다.
@Autowired
private MessageSource messageSource;

/**
 * @return Car 객체 검증 성공 여부
 */
@GetMapping("validate/automatically")
public boolean automaticallyValidateCar(@ModelAttribute @Valid Car car) {
	logger.debug("validate automatically. {}", car);

	return true;
}

/**
 * Bean Validation에 실패했을 때, 에러메시지를 내보내기 위한 Exception Handler
 */
@ExceptionHandler({BindException.class})
public ResponseEntity<String> paramViolationError(BindException ex) {
	logger.error(ex.getMessage());
	return ResponseEntity.badRequest().body(messageSource.getMessage(ex.getFieldError(), Locale.getDefault()));
}
위 코드에서 컨트롤러 메서드에서 BindingResult 객체를 받지 않는 것을 볼 수 있다. @Valid 애노테이션을 붙인 컨트롤러 메서드도 마찬가지로 검증 에러를 BindingResult 객체에 저장을 하는데, 만약 컨트롤러 메서드가 BindingResult 객체를 받지 않는다면 검증에러 발생 시 BindException을 내보낸다.
이 예외는 HTTP 상태코드 400으로 처리되는데, 위 코드에서는 BindException을 400으로 처리는 그대로 하지만, body에 에러메시지를 담아서 내보내기 위해 ExceptionHandler 메서드를 정의하였다.
Custom Constraints
Hibernate Validator의 built-in 애노테이션으로만 거의 대부분의 검증을 할 수 있다. 하지만 필요할 경우 직접 정의한 검증 방법을 사용해야할 때도 있다.
Bean Validation의 검증은 @Constraint 애노테이션과 ConstraintValidator 인터페이스의 구현체로 나뉜다. 직접 정의할 애노테이션 위에 @Constraint 애노테이션을 붙이는데, @Constraint 애노테이션은 어떤 ConstraintValidator를 이용해 검증할 것인지 validatedBy 속성을 통해 정할 수 있다.
주어진 문자열이 소문자 알파벳으로만 이루어져있는지 검사하는 검증 애노테이션과 Validator 구현체 작성해보자. Hibernate Validator의 @Pattern 애노테이션을 이용해도 되지만, 매번 정규표현식 객체를 생성하고 검사하기때문에 비효율적이다.
/**
 * 파라미터와 필드 검증 시 문자열에 소문자 알파벳만 존재하는 지 확인하기 위한 annotation
 */
@Target({ ElementType.FIELD, ElementType.PARAMETER})
@Retention(RUNTIME)
@Constraint(validatedBy = { LowercaseAlphabetsValidator.class })
public @interface LowercaseAlphabets {
	String message() default "The value must be composed by lowercase alphabets.";

	Class<?>[] groups() default { };

	Class<? extends Payload>[] payload() default { };
}
/**
* LowercaseAlphabets 애노테이션이 붙은 필드 혹은 파라미터가 소문자 알파벳으로만 이루어져 있는지 확인한다.
*/
public class LowercaseAlphabetsValidator implements ConstraintValidator<LowercaseAlphabets, String> {
private static final int LOWER_CASE_A_ASCII = (int)'a';
private static final int LOWER_CASE_Z_ASCII = (int)'z';
@Override
public void initialize(LowercaseAlphabets constraintAnnotation) {}
/**
* 입력받은 문자열이 소문자 알파벳으로만 이루어져 있는지 검사하는 메서드
* @param value 검사할 문자열
* @param context constraint context
* @return 검증 결과
*/
@Override
public boolean isValid(String value, ConstraintValidatorContext context) {
for (int i = 0; i < value.length(); i++) {
char c = value.charAt(i);
if (c < LOWER_CASE_A_ASCII || LOWER_CASE_Z_ASCII < c) {
return false;
}
}
return true;
}
}
위 코드에서 @LowercaseAlphabets 애노테이션을 보면 message, groups, payload 세가지 속성을 가지고 있는 것을 볼 수 있는데, @Constraint 애노테이션의 javadoc에 따르면 제약 조건을 정의하는 애노테이션은 언급한 세가지 속성을 반드시 가지고 있어야한다.
LowercaseAlphabetsValidator 클래스는 @LowercaseAlphabets 애노테이션이 붙은 값을 어떤식으로 검증할지에 대한 구현을 담고있다.
Spring은 ConstraintValidator 인터페이스의 구현체를 런타임에 Bean으로 등록시킨다. 위 코드에서 사용하지 않았지만, Bean으로 등록된 덕분에 ConstraintValidator 인터페이스의 구현 클래스는 Spring의 의존성 주입을 사용할 수 있는 이점이 있다.
Car 클래스 필드에 @LowercaseAlphabets 애노테이션을 붙이고 테스트해보자.
public class Car {
	@NotBlank(message = "The manufacturer must not be empty.")
	@LowercaseAlphabets
	private String manufacturer;

	@Range(min = 0, max = 10, message = "The seat count must be between 0 ~ 10")
	private int seatCount;

	@Range(min = 0, max = 300, message = "The speed must be between 0 ~ 300")
	private int topSpeed;

	// getters and setters
}
// ...
// not lowercase alphabet manufacturer
this.mockMvc.perform(get("/car/validate/automatically")
.characterEncoding("utf-8")
.param("manufacturer", "AbCd")
.param("seatCount", "4")
.param("topSpeed", "200"))
.andDo(print())
.andExpect(status().isBadRequest());
// ...
manufacturer 필드에 @LowercaseAlphabets 애노테이션을 붙였다. 그리고 테스트할 때 "AbCd"라는 소문자가 아닌 문자열을 파라미터로 넘겼다. 아래 그림 5는 테스트의 실행 결과이다.
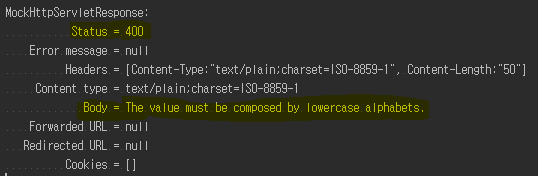
그림 5를 보면 400 코드와 함께 @LowercaseAlphabets 애노테이션의 message 속성에 default로 정의한 에러메시지가 나타나는 것을 볼 수 있다.
참고
Validation
https://docs.spring.io/spring/docs/4.1.x/spring-framework-reference/html/validation.html
7. Validation, Data Binding, and Type Conversion
There are pros and cons for considering validation as business logic, and Spring offers a design for validation (and data binding) that does not exclude either one of them. Specifically validation should not be tied to the web tier, should be easy to local
docs.spring.io
https://medium.com/@gaemi/java-%EC%99%80-spring-%EC%9D%98-validation-b5191a113f5c
Java 와 Spring 의 Validation
이 글은 Bean Validation 과 그 구현체인 Hibernate Validator 그리고 Spring Validation 에 대해서 다루고 있습니다.
medium.com
Hibernate Validator
http://hibernate.org/validator/
The Bean Validation reference implementation. - Hibernate Validator
Express validation rules in a standardized way using annotation-based constraints and benefit from transparent integration with a wide variety of frameworks.
hibernate.org
Hibernate Validator built-in constraints
Hibernate Validator 6.0.16.Final - JSR 380 Reference Implementation: Reference Guide
Validating data is a common task that occurs throughout all application layers, from the presentation to the persistence layer. Often the same validation logic is implemented in each layer which is time consuming and error-prone. To avoid duplication of th
docs.jboss.org
MockMvc
Spring MockMvc(spring-test) :: JDM's Blog
스프링 프레임워크에서 단위 테스트의 중요성은 다들 아실거라 생각합니다. :D 이번 포스팅에서는 Spring 3.2부터 사용 가능한 MockMvc를 활용한 단위 테스트에 대해 알아보고자 합니다. 또한 Springboot에서 같은 방법으로 사용가능합니다. Spring MockMvc spring.io에서 Spring Framework 3.2 RC1: Spring MVC Test Framework라는 이름으로 포스팅이 되었습니다. 시간 나면 읽어보세요. :D M
jdm.kr
'프로그래밍 > Web' 카테고리의 다른 글
| Spring 다국어 처리 (0) | 2019.09.24 |
|---|---|
| webpack 정리 (0) | 2019.03.05 |
| Maven 프로젝트 나눠서 관리하기 (0) | 2019.03.05 |
| Spring Error Page (0) | 2018.08.09 |
| Spring REST API 이미지 또는 파일을 리턴하기 (4) | 2018.08.09 |
- Total
- Today
- Yesterday
- 클로저
- mybatis
- spring batch
- Closure
- Barycentric coordinates
- Linux
- thymeleaf cannot resolve
- @Component
- nodejs
- npm
- thymeleaf 변수 인식
- chunk
- JavaScript
- @Qualifier
- @Autowired
- spring
- unity
- Bean
- @Bean
- Express
- Check point within polygon
- Bin
- MySQL
- Tasklet
| 일 | 월 | 화 | 수 | 목 | 금 | 토 |
|---|---|---|---|---|---|---|
| 1 | 2 | |||||
| 3 | 4 | 5 | 6 | 7 | 8 | 9 |
| 10 | 11 | 12 | 13 | 14 | 15 | 16 |
| 17 | 18 | 19 | 20 | 21 | 22 | 23 |
| 24 | 25 | 26 | 27 | 28 | 29 | 30 |